 how-to
How to Inspect Your Home for Termites Step by Step
Table of Contents
- Step 1: Get Your Termite Inspection Checklist and Safety Gear Ready
- Step 2: Walk the Exterior and Check Termite Entry Points
- Step 3: Signs of Termites in House: Internal Room-by-Room Check
- Step 4: Inspect the Subfloor, Crawl Space and Roof Void Where Accessible
- How to Document and Interpret Your Findings
- How Often to Inspect for Termites (and When to Call a Professional)
- Professional Termite Inspection: What a Qualified Inspector Does Differently
- Frequently Asked Questions
Last Updated: October 7, 2026
Step 1: Get Your Termite Inspection Checklist and Safety Gear Ready
Learning how to inspect your home for termites step by step starts with the right gear and a clear plan. At Challenge Pest Control, we've checked thousands of properties since 1987, and the homes that catch termites early are the ones where someone looks regularly with the right tools.
Termite damage is often hidden until it's advanced, which is why early detection matters so much. A basic DIY check won't replace a professional, but it can help you spot warning signs sooner.
Grab these items before you start:
- A bright torch for dark corners
- A flat-head screwdriver or tapping stick
- A moisture meter if you have one
- A notepad or phone for photos
Tools You Need for a Basic Termite Check
You don't need expensive gear for a visual inspection. A torch, a tapping stick and a moisture meter cover most of what you'll check.
The tapping stick lets you listen for hollow-sounding timber. A moisture meter helps you find damp patches that attract termites.
CSIRO termite research and management guidance
Safety Limits: When Not to Investigate
Some areas are not safe for a DIY check. Stay out of subfloors with less than 400mm clearance, and never crawl into a space with exposed wiring or unstable stumps.
If you see sagging floors or cracked bearers, stop and call a professional. Structural damage means the area may not hold your weight.
Step 2: Walk the Exterior and Check Termite Entry Points
The exterior is where most termite problems begin. A slow walk around your home, checking the base of walls and foundations, takes about 15 minutes.
Look for termite entry points first. These include gaps around pipes, cracks in foundations and any timber touching soil.
Where to Look for Mud Tubes and Damaged Timber Outside
Mud tubes are the clearest outdoor sign. Termites build these pencil-width tunnels to travel from soil to timber without drying out.
Check these spots on your exterior inspection:
- The base of brick and weatherboard walls
- Garden beds against the house
- Timber retaining walls and sleepers
- Fence posts close to the building
Tap any suspect timber with your screwdriver. A dull, hollow sound suggests termite tunnels inside.
Also look for damaged wood that crumbles easily or sounds empty when tapped.
Step 3: Signs of Termites in House: Internal Room-by-Room Check
Inside the home, work through each room in a fixed order so nothing gets skipped. A logical route is: entry and hallway first, then living areas, then kitchen and laundry, then bedrooms, then bathrooms and wardrobes.
Carry your torch, tapping stick, notepad and phone. At each room, check the same five locations before moving on:
- Skirting boards along external walls
- Door frames and architraves, especially at the bottom corners
- Window sills and frames
- Built-in cupboards, wardrobes and pantry linings
- Any timber flooring, particularly near wet areas
What Each Sign Actually Means
Understanding the mechanism behind each sign helps you judge how seriously to take it.
- Mud tubes, pencil-width tunnels of soil, saliva and faeces. Termites build them to travel from soil to timber without drying out. Finding one on an internal wall usually means the colony has already bridged from outside.
- Hollow-sounding timber, termites eat timber from the inside out, leaving a thin shell. A dull, papery tap sound is the giveaway. Tap along the grain, not across it, for a clearer read.
- Bubbling or cracked paint, moisture from termite activity pushes paint away from the surface. It looks like blistering, not flaking.
- Tight-fitting doors and windows, termites add moisture to timber, which makes it swell. A door that suddenly sticks in a dry room is worth investigating.
Room-by-Room Checklist You Can Print
Use this as a printable checklist. Tick each location as you go, and note anything suspicious.
| Room | Check | Sign to record | Follow-up |
|---|---|---|---|
| Entry / hallway | Skirting, door frame, floor | Hollow tap, mud tube, wings | Photograph and date |
| Living areas | Skirting, window frames, floorboards | Bubbling paint, tight windows | Photograph and date |
| Kitchen | Kickboards, pantry lining, sink cabinet | Damp timber, mud tube | Check moisture source |
| Laundry | Cabinet lining, floor near taps | Damp timber, hollow tap | Check for leaks |
| Bedrooms | Wardrobe lining, skirting, door frame | Hollow tap, wings | Photograph and date |
| Bathrooms | Vanity cabinet, skirting, floor | Damp timber, bubbling paint | Check for leaks |
Interpreting What You Find
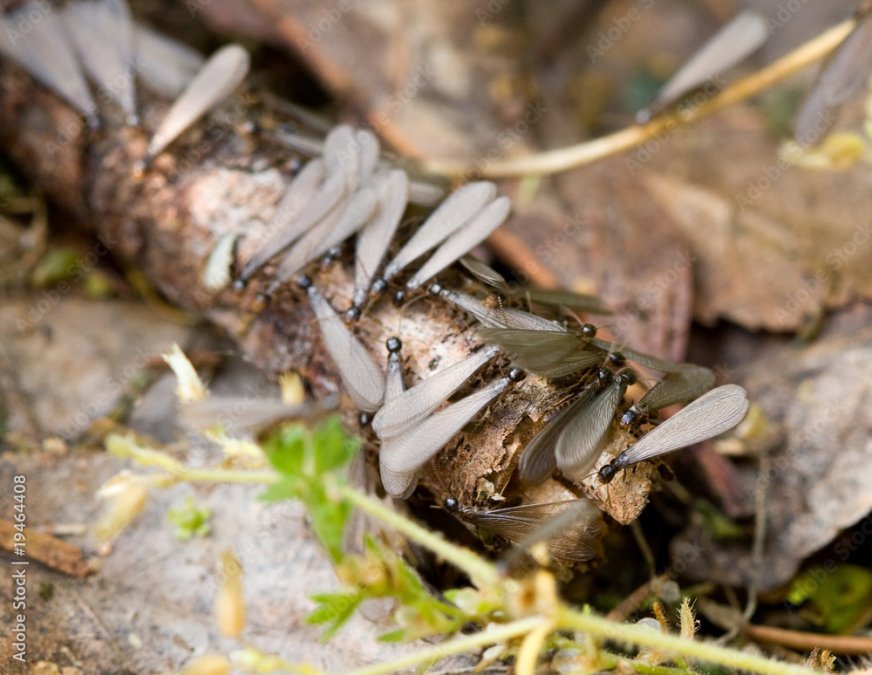
A single mud tube does not confirm an active infestation. It is, however, a strong reason to book a professional termite inspection. The same applies to a small pile of wings, it may be from a swarm that failed to establish, or it may be the start of a new colony nearby.
What you cannot tell from a visual check is whether termites are still active, how far they have spread, or whether the colony is in your home or a neighbouring tree.
Step 4: Inspect the Subfloor, Crawl Space and Roof Void Where Accessible
Accessible areas give you the best view of termite activity, but they are also the most dangerous part of a DIY inspection. Treat safety as the first check, not an afterthought.
Subfloor and Crawl Space
Before you enter, confirm three things:
- Clearance, you need at least 400mm of vertical clearance to move safely. Less than that, and you risk getting stuck or panicking in a confined space.
- Lighting, use a torch, not your phone. You need both hands free.
- Stability, if you see sagging floors, cracked bearers or unstable stumps, do not enter. Structural damage means the area may not hold your weight.
If the space is safe, move in this order:
- Stumps and piers, check for mud tubes running up from the soil, and for timber that crumbles or sounds hollow.
- Bearers, the horizontal timbers supporting the floor. Check the ends where they meet stumps, as this is a common entry point.
- Joists, the timbers running across the bearers. Tap along each one within reach.
- Floor underside, look for mud tubes, damp patches and staining.
- Soil line, check for termite workings in the soil itself, and for any timber left in contact with the ground.
Roof Void
Roof voids are hotter, dustier and often harder to access than subfloors. Only enter if there is a safe, fixed access point and you can move without stepping off joists.
If you enter, check:
- Roof timbers, rafters, battens and trusses. Look for mud tubes and hollow-sounding timber.
- Top of wall frames, this is where termites often enter from the wall cavity below.
- Insulation, check for mud tubes running through or under insulation batts.
- Any stored timber, offcuts and stored boards can harbour termites.
When to Stop and Call a Professional
Stop your inspection immediately if you find:
- Live termites or a nest
- Mud tubes on structural timbers
- Hollow timber in bearers, joists or roof timbers
- Sagging floors or cracked structural members
- Any area where you feel unsafe
Inaccessible Areas: What You Cannot Check
A visual DIY inspection cannot cover everything. Common inaccessible areas include:
- Wall cavities behind brick or plasterboard
- Under fixed flooring such as tiles or floating floors
- Behind built-in cabinetry
- Subfloors with less than 400mm clearance
- Roof voids without a safe access point
This is why a DIY check cannot rule out termites. It can flag warning signs, but it cannot confirm whether termites are active, how far they have spread, or what treatment is needed. A licensed inspector uses thermal imaging, moisture meters and experience to assess the areas you cannot see.
How to Document and Interpret Your Findings
Good notes make your findings useful. Take photos of anything suspicious, and write down the location and what you saw.
Document these details:
- The exact spot (room, wall, height)
- What you found (mud tubes, wings, hollow timber)
- Whether the area was damp
- The date of your check
A single mud tube doesn't confirm an active infestation. But it's a strong reason to book a professional termite inspection.
How Often to Inspect for Termites (and When to Call a Professional)
Most homes benefit from a professional termite inspection every 12 months. In high-risk areas with lots of moisture or older timber, check more often.
Do your own visual checks every few months between professional visits. This helps you spot changes early.
Call a professional straight away if you find:
- Live termites or a nest
- Mud tubes on walls or foundations
- Hollow timber in structural parts of the home
- Discarded wings in large numbers
Challenge Pest Control offers 24/7 service, so you can call any time, even at 2am on a Sunday. Our team is fully insured and all work is guaranteed.
Professional Termite Inspection: What a Qualified Inspector Does Differently
A professional termite inspection goes further than a DIY check. Inspectors use thermal imaging cameras and moisture meters to find activity hidden behind walls.
They also know where termites are likely to enter and how to assess the extent of an infestation. This matters because termite damage can be serious if it's left too long.
| What You Can Check | What a Professional Adds |
|---|---|
| Visible mud tubes | Thermal imaging behind walls |
| Hollow timber by tapping | Moisture readings and timber testing |
| Discarded wings | Colony location and extent |
| Exterior entry points | Full subfloor and roof void access |
Challenge Pest Control has handled termite inspections and treatments since 1987. We offer free quotes and free advice, plus pensioner discounts.
Frequently Asked Questions
Can you inspect for termites yourself?
You can do a basic visual check for mud tubes, damaged timber, and discarded wings, but a DIY inspection cannot confirm whether termites are active behind walls or under floors. Use a torch and tapping stick to check accessible areas, and record anything suspicious. If you find evidence, call a licensed pest controller for a professional termite inspection. DIY checks help with early detection but are not a substitute for a qualified assessment.
What are the first signs of termites in a house?
The earliest signs include mud tubes on foundations or walls, hollow-sounding timber when tapped, and discarded wings near windows or doors. You might also notice tight-fitting doors or windows that suddenly stick, or small piles of frass (termite droppings). In Australia, subterranean termites often leave mud tubes as shelter. Check moisture-prone areas like bathrooms and subfloors first, as termites are drawn to damp timber.
How often should you inspect your home for termites?
Aim to check accessible areas every three to six months, especially in warmer months when termites are active. A professional termite inspection is recommended at least once a year, or every six months in high-risk areas. Regular checks help with early detection and prevent structural damage. If you have had termites before, increase frequency to every three months. Your pest controller can advise on a schedule based on your property's risk factors.
Is termite treatment safe for kids and pets?
Licensed pest controllers use products registered with the Australian Pesticides and Veterinary Medicines Authority (APVMA) and follow strict safety guidelines. Treated areas are usually safe once dry, but keep children and pets away until the product has settled. Ask your technician for specific re-entry times and any precautions. Challenge Pest Control is fully insured and can explain the safety data for the products used in your home.
Termites rarely announce themselves. By the time damage is visible, the colony may have been working quietly for months or years. If your own checks turn up mud tubes, discarded wings or hollow timber, don't wait to see what happens next. Challenge Pest Control offers 24/7 availability, fully insured termite inspections and treatments, free quotes and advice, and pensioner discounts. Call and book today on 0422926291.